EQ6-R Pro, ZWO, and N.I.N.A
EQ6-R Pro, ZWO, and N.I.N.A
About a year ago I started to get into astrophotography. Lately I’ve been exploring other tooling and one thing I found to be a struggle was a concise end-to-end guide of what I needed to get setup (reflective of the current gen drivers/etc). After many hours stumbling and repeating this process a few times, I figured I’d document this for myself in case I need a reference in the future. This involved piecing together a lot of different sources - many outdated - and while it’s specific to my particular equipment, it may also be helpful if you have a subset.
So first, let’s talk about the hardware used:
- Mount: Sky-Watcher EQ6-R Pro
- Camera: ZWO ASI62000MC
- Guide Camera: ZWO ASI290MM Mini
- Focuser: ZWO EAF
- Filter wheel: ZWO 5-slot EFW
We’re configuring this all on a Mele Quieter2 mini PC running Windows 10 (though the same instructions should be working fine on Win11).
Note: If you’re following these instructions, note that this ecosystem seems to change surprisingly fast, so some links may end up outdated or instructions slightly off.
Given I’m fairly new to this method of imaging, this post is going to focus on how to get everything setup, rather than the actual usage of the software.
Let’s get into it.
# This code block gets replaced with the TOC#Setting up ASCOM
For controlling many of the hardware components we’re going to be relying on the ASCOM platform. This is Windows-specific, and there are alternatives if you’re using another operating system. It’s important you install the ASCOM Platform before installing any of the equipment-specific packages.
The ASCOM platform is available at:
https://www.ascom-standards.org
You should end up with a binary named similar to ASCOMPlatform65.exe. The install should be self explanatory.
Make sure you’ve also installed the Microsoft .NET Framework 3.5.x series before hand:
https://www.microsoft.com/en-us/download/details.aspx?id=22
From here you can setup your equipment in any order you like.
#EQ6-R Pro and EQMod’s EQASCOM
For controlling we will rely on an ASCOM driver by EQMod. However, because we’re utilizing the USB port on the EQ6-R Pro, we also need a serial-to-usb driver (to map the USB port to a virtual serial port).
Download the virtual serial port driver from:
http://www.prolific.com.tw/US/ShowProduct.aspx?p_id=225&pcid=41
Next up, the EQASCOM software:
http://eq-mod.sourceforge.net/reqindex.html
Make sure you get EQASCOM, as there are multiple downloads available! Ignore the “Download Latest Version” button and instead select the exact file in the list for EQASCOM.
Once you’ve installed both packages you will also need to configure the serial port driver. To do this:
- Open ‘Device Manager’
- Expand the ‘Ports (COM & LPT)’ selection of devices
- Find the
Prolific USB-to-Serial Comm Portdevice in this list - Right-click the device and select ‘Properties’
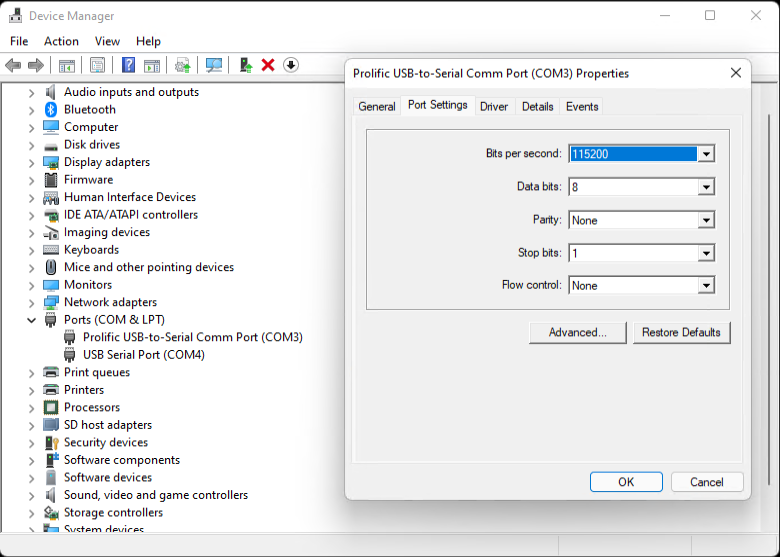
There are a two things you need to do now:
- Note the COM port (e.g.
COM3) - Under ‘Port Settings’, change the ‘Bits per second’ (Baud rate) value to
115200
You will reference both of these values routinely. It’s also worth noting that if you change your devices around (e.g. plug the mount into a different USB port) the COM port may also change.
Now open the ‘Toolbox’ (EQASCOM Toolbox) application installed by EQASCOM, and you’ll be presented with a screen that looks like this:
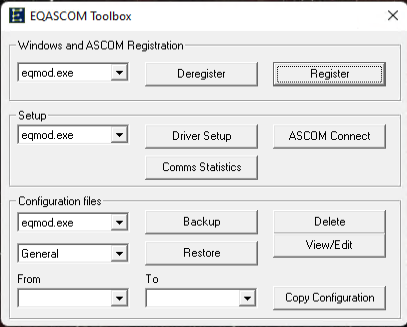
Select ‘Driver Setup’, and you’ll see the following:
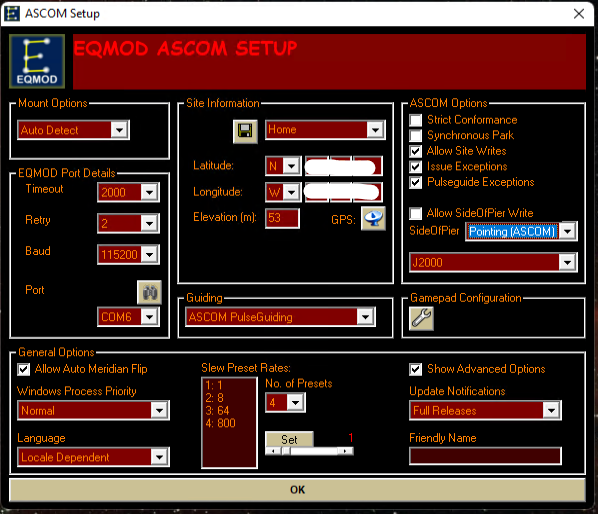
Here are the rough details of what you need to change:
**EQMod Port Details**

- Timeout: `2000`
- Retry: `2`
- Baud: `115200`
- Port: [the virtual com port]

You can use the binoculars icon to try to automatically identify the COM port as well.

**Site Information**

Create a name for your site, and click the Save button. We'll be able to synchronize this
with N.I.N.A. later.

**Guiding**

- Ensure `ASCOM PulseGuiding` is selected

**General Options**

- Enable `Allow Auto Meridian Flip`

**ASCOM Options**

- SideOfPier: `Pointing (ASCOM)`
- Enable `Allow Site Writes`
- Set the Epoch to `J2000`
You can now close the setup dialog.
Next up we’re going to connect the mount. You can come back to this after setting up N.I.N.A. or you can run EQASCOM_Run to do it now:
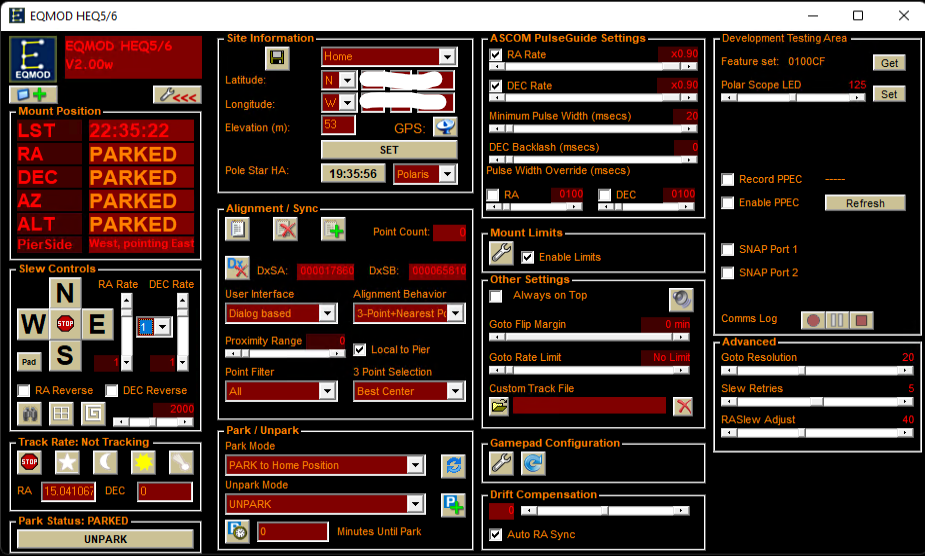
There’s a few more things to configure here:
**Alignment / Sync**

- User Interface: `Dialog Based`

**ASCOM PulseGuide Settings**

- Enable 'RA Rate' at `0.90`
- Enable 'DEC Rate' at `0.90`
- Set 'DEC Backlash' to `0`
- Disable 'RA' and 'DEC' on 'Pulse Width Override'

**Other Settings**

- [Recommended] Disable 'Always on Top'
See also this document for reference on the EQASCOM settings.
TODO: I’ve yet to set the limits on this mount, but it is encouraged to do so in case the software were to make a mistake. This would ensure that OTA and equipment will never crash into your mount.
#ZWO Equipment (EAF, EFW, Cameras)
ZWO equipment is managed by either a native Windows driver, or an ASCOM compatible driver. The method used depends on the equipment, but we’ll walk through each one in our setup list.
You can find these downloads on the ZWO website:
https://astronomy-imaging-camera.com/software-drivers
You’re going to need to download the following:
Native Drivers
- ASI Cameras
ASCOM Drivers
- ASI Cameras
- EFW
- EAF
Go through the setup for each of these. It should be straight forward. If you get prompted for a driver install by Windows Security make sure to ‘Always Trust software from “SUZHOU ZWO CO.,LTD.”’
#SharpCap
SharpCap has a variety of functions, and while I haven’t used it extensively, it may be helpful for both polar alignment as well as dialing in focus on your cameras.
Download SharpCap at:
Once you’ve installed it, let’s connect the focuser and filter wheel. Select ‘File’ > ‘SharpCap Settings’, and under the ‘Hardware’ tab:
- The focuser uses ASCOM; select
ZWO EAF (1) - Under ‘Backlash Compensation’ select
Handled by ASCOM driver - The filter wheel uses ASCOM; select
ZWO FilterWheel (1)
Lastly, you’ll find the camera available under ‘Cameras’ > ZWO [model].
Note: You specifically are looking for the native camera driver, not the ASI Camera (N) ASCOM implementation.
#PHD2
PHD2 is the standard for autoguiding - utilizing your guidescope and a camera to make corrections to the mount.
Download PHD2 at:
Once you’ve installed PHD2, make sure your mount and guide camera are plugged in and launch the program. You’ll be prompted with the PHD2 ‘first light’ wizard.
On the first screen we’re configuring the guide camera:
- Select
ZWO ASI Camera(native drivers, not ASCOM) for the ‘Guide Camera’ - Select ‘Yes’ when prompted about the camera connection. This should automatically fill out the pixel size details. For example with my camera it automatically adjusted it to
3.76. - Enter the focal length of your guide scope (e.g.
200) - Click ‘Next’
On the next screen we’ll be configuring the mount:
- Select
EQMOD ASCOM HEQ5/6for the ‘Mount’ - Select ‘Yes’ when prompted about the mount connection. This should automatically update the mount guide speed, but if it does not, set it to
0.90. Note this is the same value we adjusted in EQASCOM. - Click ‘Next’
You’ll be prompted with a screen for Adaptive Optics. We don’t have any so simply click ‘Next’.
Finally choose a profile name, uncheck ‘Build dark library’, and click ‘Finish’.
You’ll want the dark library, but first we need to ensure the right camera is selected:
You can now connect the equipment and build your dark library. Do this under ‘Darks’ > ‘Dark Library…’. I don’t know what I’m doing so I just leave the defaults and click ‘Start’.
Lastly, before closing PHD2, under ‘Tools’ ensure ‘Enable Server’ is checked.
#ASTAP
ASTAP is what we’ll be using to do plate-solving, which is very useful polar alignment as well as slewing and centering targets.
Download ASTAP, as well as the G17 star database installer from:
https://www.hnsky.org/astap.htm
Install ASTAP followed by the star database.
We will configure ASTAP later.
#Nightime Imaging ‘N’ Astronomy (N.I.N.A.)
Finally on to the meat of things. N.I.N.A. is going to be used as our sequencer, running our imaging sessions, but will also be used to manage most of our equipment.
Download N.I.N.A. at:
I also recommend downloading the ‘Sky Atlas Image Repository’ to reduce internet usage. If you go this route, I suggest extracting the archive to C:\Users\[YourName]\Documents\N.I.N.A\SkyAtlasImageRepository
Launch N.I.N.A. to begin setting it up.
#Equipment
Ensure ‘Equipment’ is selected. It’s mostly straight forward here - we just need to be aware of which driver variation is selected in some cases.
Note that for all equipment there is additional configuration available (the cog icon), but it often requires you to first ‘connect’ the device (using the power symbol next the device list).
Camera
To continue on theme, we want to use native drivers for our cameras. Select your main camera under ‘ZWOptical’.
No configuration has been needed here in my experience. You may will want to confirm (and/or adjust) your default gain and target cooling temperature.
Filter Wheel
Under ‘ZWOptical’ select the ZWOptical Filter Wheel.
Note to change the filter names, you need to head to the ‘Options’ panel and select ‘Equipment’.
Focuser
The focuser uses the ASCOM driver, so select ZWO Focuser (1). You may need to tune your focuser, which you can do by clicking the settings icon. In my case I also had to enable ‘Reverse’.
Telescope
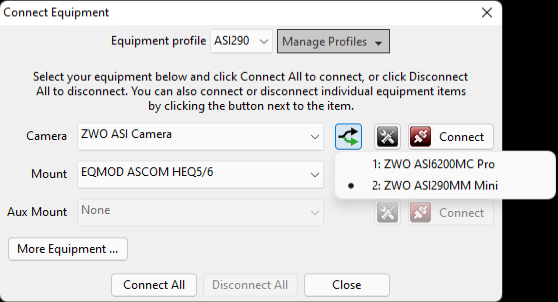
Under ASCOM select EQMOD ASCOM HEQ5/6. Clicking the settings here will open the EQASCOM Toolbox application that we configured earlier.
If you click ‘Connect’ you may be prompted to synchronize your latitude/longitude. If you had previously entered this into EQASCOM, select ‘Telescope to NINA’ when prompted.
Guider
Select PHD2. Clicking ‘Connect’ will automatically launch PHD2.
#Options
Under the Options panel we need to configure a number of things, including plate solving.
General
Under ‘Astometry’ you’ll see your coordinates, which can be imported from a planetarium software using the location icon.
If you opted for the Sky Atlas Image Repository download, configure the path under ‘Sky Atlas image folder’.
Bonus: the ‘Navy’ theme is going to make life a lot more bearable.
Equipment
Under ‘Telescope’, make sure to set the ‘Focal Length’. You can also configure any planetarium you wish to use here.
Imaging
Under ‘Auto Meridian Flip’:
- Select
Enabledto turn it on - Enable
Use Telescope Side of Pier - Enable
Recenter after flip - Enable
Autofocus after flip
Plate Solving
Select the ‘Plate Solving’ subpanel and ensure ASTAP is selected for ‘Plate Solver’ and ‘Blind Solver’.
In the ‘Plate Solver Settings’, select ASTAP and double check ‘ASTAP location’. In my case it should be set to C:\Program Files\astap\astap.exe
Lastly you may want to tweak the ‘Filter’ (to use a broadband/luminance filter) as well as the ‘Gain’ setting.
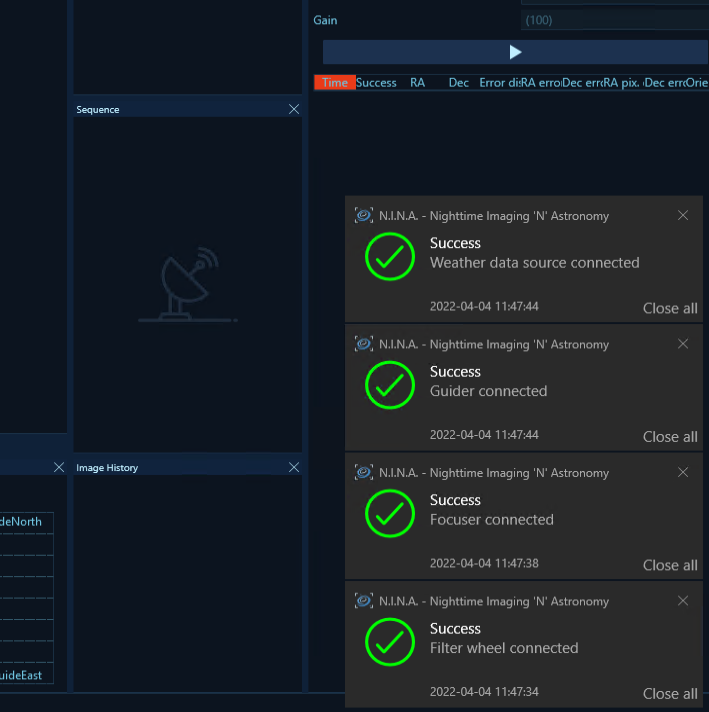
#Test Equipment
You can now click the power button panel to connect all equipment. This should launch PHD2 and display a number of successful connection messages.
#Fin
I don’t know how much use I’ll get out of N.I.N.A. with my EQ6-R Pro as I’m upgrading to a Paramount MX+ as we speak. I went through the effort to set all this up so I could start learning how to use the tools since I am unlikely going to be able to utilize my ASIAIR Pro with my new mount.
Either way, hopefully I’ve helped you, or at the very least helped myself when I inevitably have to set this all up again!
p.s. If you’re into APO and in the Bay Area hit me up.
p.p.s Obligatory plug for my terrible instagram: https://www.instagram.com/noevalleyastronomer/